 参数化@pytest.mark.parametrize
# 前言
pytest允许在多个级别启用测试参数化:
- pytest.fixture() 允许fixture有参数化功能(后面讲解)
- @pytest.mark.parametrize 允许在测试函数或类中定义多组参数和fixtures
- pytest_generate_tests 允许定义自定义参数化方案或扩展(拓展)
# 参数化场景
只有测试数据和期望结果不一样,但操作步骤是一样的测试用例可以用上参数化;
可以看看下面的栗子
# 未参数化的代码
def test_1():
    assert 3 + 5 == 9

def test_2():
    assert 2 + 4 == 6

def test_3():
    assert 6 * 9 == 42
2
3
4
5
6
7
8
可以看到,三个用例都是加法然后断言某个值,重复写三个类似的用例有点冗余
# 利用参数化优化之后的代码
@pytest.mark.parametrize("test_input,expected", [("3+5", 8), ("2+4", 6), ("6*9", 42)])
def test_eval(test_input, expected):
    print(f"测试数据{test_input},期望结果{expected}")
    assert eval(test_input) == expected
2
3
4
# 执行结果
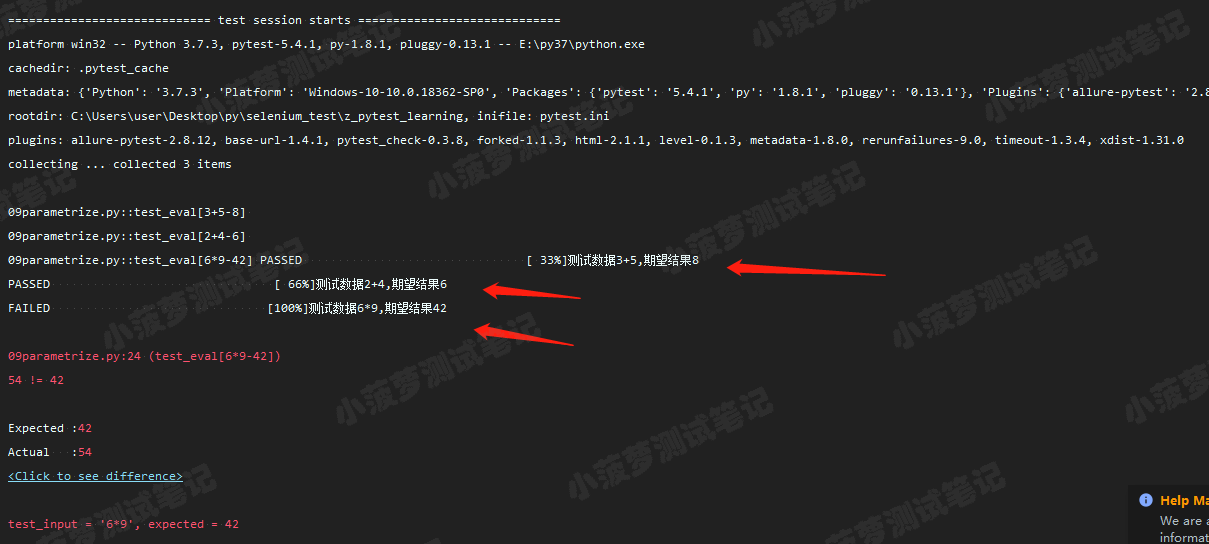
可以看到,只有一条用例,但是利用参数化输入三组不同的测试数据和期望结果,最终执行的测试用例数=3,可以节省很多代码
# 实际Web UI自动化中的开发场景,比如是一个登录框
- 你肯定需要测试账号空、密码空、账号密码都为空、账号不存在、密码错误、账号密码正确等情况
- 这些用例的区别就在于输入的测试数据和对应的交互结果
- 所以我们可以只写一条登录测试用例,然后把多组测试数据和期望结果参数化,节省很多代码量
# 源码分析
def parametrize(self,argnames, argvalues, indirect=False, ids=None, scope=None):
# argnames
**源码解析:**a comma-separated string denoting one or more argument names, or a list/tuple of argument strings.
**含义:**参数名字
格式:字符串"arg1,arg2,arg3"【需要用逗号分隔】
**备注:**源码中写了可以是参数字符串的list或者tuple,但博主实操过是不行的,不知道是不是写的有问题,大家可以看看评论下
示例
@pytest.mark.parametrize(["name", "pwd"], [("yy1", "123"), ("yy2", "123")])
@pytest.mark.parametrize(("name", "pwd"), [("yy1", "123"), ("yy2", "123")])
@pytest.mark.parametrize("name,pwd", [("yy1", "123"), ("yy2", "123")])
2
3
备注
有朋友提出现在上面标注错的两个可以正常使用了
# argvalues
源码解析:
- The list of argvalues determines how often a test is invoked with different argument values.
- If only one argname was specified argvalues is a list of values.【只有一个参数,则是值列表】
- If N argnames were specified, argvalues must be a list of N-tuples, where each tuple-element specifies a value for its respective argname.【如果有多个参数,则用元组来存每一组值】
**含义:**参数值列表
**格式:**必须是列表,如:[ val1,val2,val3 ]
如果只有一个参数,里面则是值的列表如:@pytest.mark.parametrize("username", ["yy", "yy2", "yy3"])
如果有多个参数例,则需要用元组来存放值,一个元组对应一组参数的值,如:@pytest.mark.parametrize("name,pwd", [("yy1", "123"), ("yy2", "123"), ("yy3", "123")])
**备注:**虽然源码说需要list包含tuple,但我试了下,tuple包含list,list包含list也是可以的........
# ids
**含义:**用例的ID
**格式:**传一个字符串列表
**作用:**可以标识每一个测试用例,自定义测试数据结果的显示,为了增加可读性
**强调:**ids的长度需要与测试数据列表的长度一致
# indirect
作用:如果设置成True,则把传进来的参数当函数执行,而不是一个参数(下一篇博文即讲解)
讲完源码,对方法有更深入的了解了,我们就讲讲常用的场景
# 装饰测试类
@pytest.mark.parametrize('a, b, expect', data_1)
class TestParametrize:

    def test_parametrize_1(self, a, b, expect):
        print('n测试函数11111 测试数据为n{}-{}'.format(a, b))
        assert a + b == expect

    def test_parametrize_2(self, a, b, expect):
        print('n测试函数22222 测试数据为n{}-{}'.format(a, b))
        assert a + b == expect
2
3
4
5
6
7
8
9
10
# 执行结果
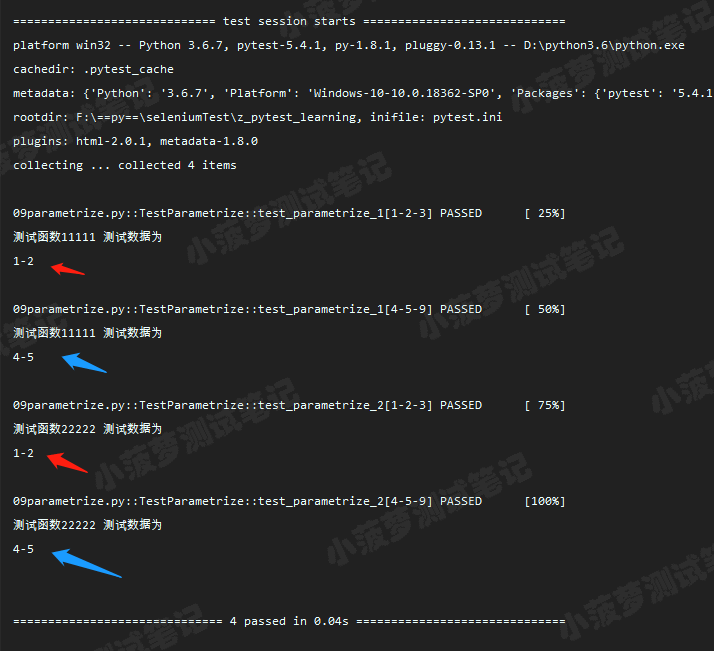
# 重点
当装饰器 @pytest.mark.parametrize 装饰测试类时,会将数据集合传递给类的所有测试用例方法
# “笛卡尔积”,多个参数化装饰器
# 笛卡尔积,组合数据
data_1 = [1, 2, 3]
data_2 = ['a', 'b']


@pytest.mark.parametrize('a', data_1)
@pytest.mark.parametrize('b', data_2)
def test_parametrize_1(a, b):
    print(f'笛卡尔积 测试数据为 : {a},{b}')
2
3
4
5
6
7
8
9
# 执行结果
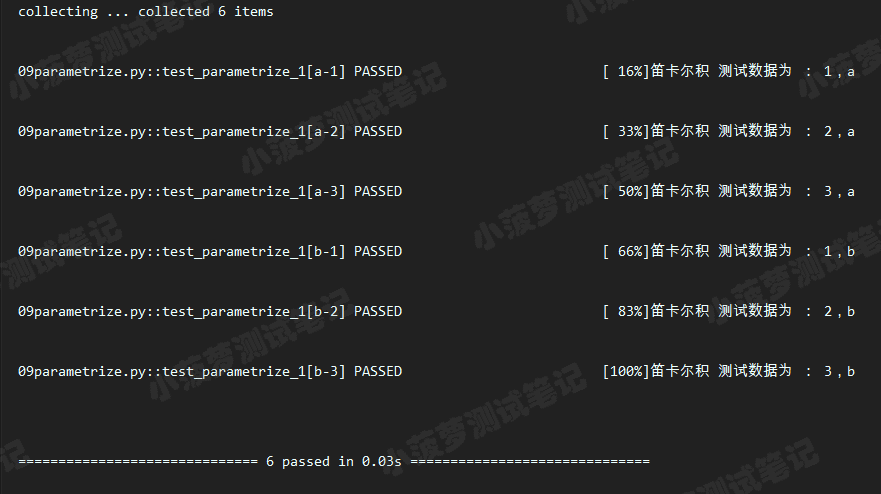
# 重点知识
- 一个函数或一个类可以装饰多个 @pytest.mark.parametrize
- 这种方式,最终生成的用例数是nm,比如上面的代码就是:参数a的数据有3个,参数b的数据有2个,所以最终的用例数有32=6条
- 当参数化装饰器有很多个的时候,用例数都等于nnnn....
# 参数化 ,传入字典数据
# 字典
data_1 = (
    {
        'user': 1,
        'pwd': 2
    },
    {
        'user': 3,
        'pwd': 4
    }
)


@pytest.mark.parametrize('dic', data_1)
def test_parametrize_1(dic):
    print(f'测试数据为n{dic}')
    print(f'user:{dic["user"]},pwd{dic["pwd"]}')
2
3
4
5
6
7
8
9
10
11
12
13
14
15
16
17
没啥特别的,只是数据类型是常见的dict而已
# 执行结果
09parametrize.py::test_parametrize_1[dic0] PASSED                        [ 50%]测试数据为
{'user': 1, 'pwd': 2}
user:1,pwd2

09parametrize.py::test_parametrize_1[dic1] PASSED                        [100%]测试数据为
{'user': 3, 'pwd': 4}
user:3,pwd4
2
3
4
5
6
7
# 参数化,标记数据
# 标记参数化
@pytest.mark.parametrize("test_input,expected", [
    ("3+5", 8),
    ("2+4", 6),
    pytest.param("6 * 9", 42, marks=pytest.mark.xfail),
    pytest.param("6*6", 42, marks=pytest.mark.skip)
])
def test_mark(test_input, expected):
    assert eval(test_input) == expected
2
3
4
5
6
7
8
9
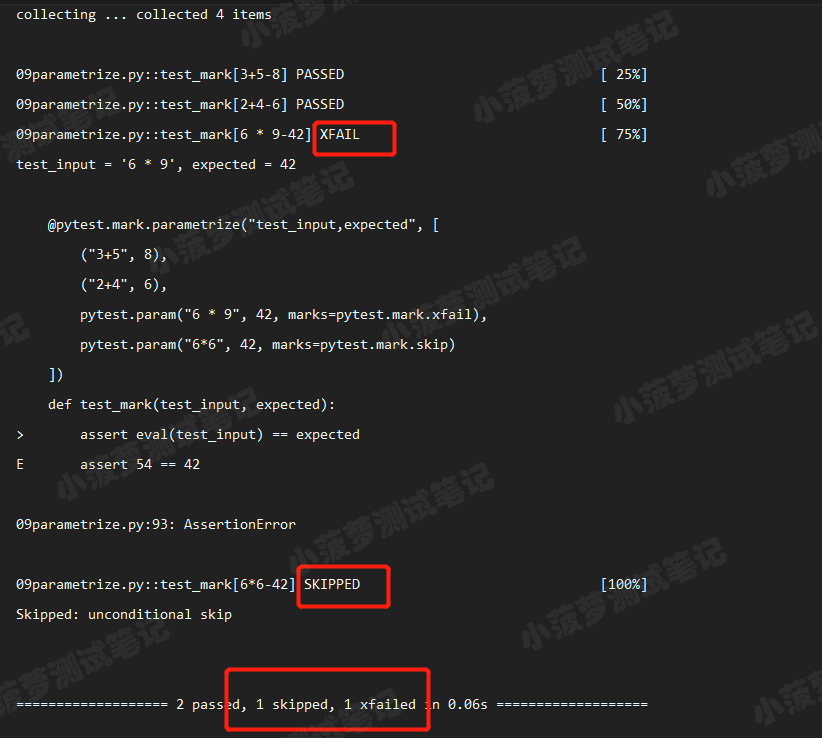
# 执行结果
# 参数化,增加可读性
# 增加可读性
data_1 = [
    (1, 2, 3),
    (4, 5, 9)
]

# ids
ids = ["a:{} + b:{} = expect:{}".format(a, b, expect) for a, b, expect in data_1]


@pytest.mark.parametrize('a, b, expect', data_1, ids=ids)
class TestParametrize(object):

    def test_parametrize_1(self, a, b, expect):
        print('测试函数1测试数据为{}-{}'.format(a, b))
        assert a + b == expect

    def test_parametrize_2(self, a, b, expect):
        print('测试函数2数据为{}-{}'.format(a, b))
        assert a + b == expect
2
3
4
5
6
7
8
9
10
11
12
13
14
15
16
17
18
19
20
# 执行结果
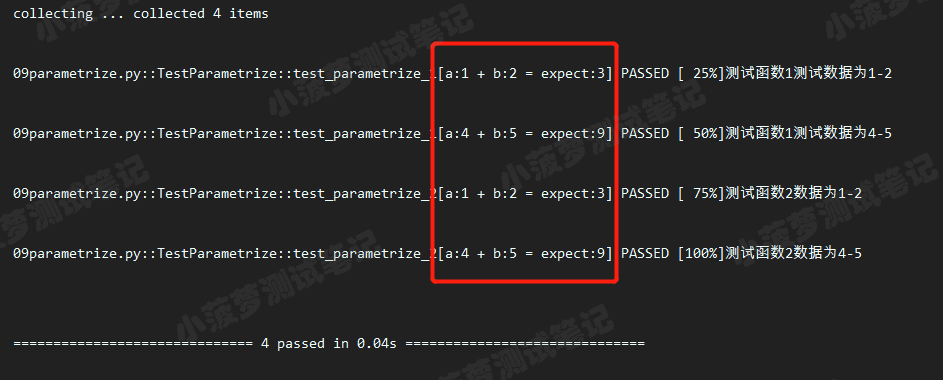
# 知识点
多少组数据,就要有多少个id,然后组成一个id的列表
**作用:**主要是为了更加清晰看到用例的含义
本文转自 https://www.cnblogs.com/poloyy/p/12675457.html (opens new window),如有侵权,请联系删除。