蟑螂恶霸的博客 蟑螂恶霸的博客
首页
  • Web自动化
  • 自动化测试框架
  • 接口自动化
  • 测试面试题
  • 技术文档
  • GitHub技巧
  • 博客搭建
  • Vue
  • JavaScript
  • Nginx
  • 自动化测试
  • 学习
  • 面试
  • 心情杂货
  • 实用技巧
  • 友情链接
关于
收藏
  • 分类
  • 标签
  • 归档
GitHub (opens new window)

蟑螂恶霸

一个爱折腾的程序员,什么都想试试!
首页
  • Web自动化
  • 自动化测试框架
  • 接口自动化
  • 测试面试题
  • 技术文档
  • GitHub技巧
  • 博客搭建
  • Vue
  • JavaScript
  • Nginx
  • 自动化测试
  • 学习
  • 面试
  • 心情杂货
  • 实用技巧
  • 友情链接
关于
收藏
  • 分类
  • 标签
  • 归档
GitHub (opens new window)
  • web自动化

  • 自动化测试框架

  • 接口自动化测试

  • 测试面试题

  • Pytest

    • 快速入门和基础讲解
    • assert断言详细使用
    • setup和teardown的详细使用
    • fixture的详细使用
    • 测试用例执行后的几种状态
    • conftest.py的详细讲解
    • skip、skipif跳过用例
    • 使用自定义标记mark
    • 参数化@pytest.mark.parametrize
    • fixture 传参数 request的详细使用
    • 失败重跑插件pytest-rerunfailures的详细使用
    • 测试结果生成HTML报告插件之pytest-html的详细使用
    • 重复执行用例插件之pytest-repeat的详细使用
      • 前言
      • 环境前提
      • 安装插件
      • 快速入门
      • 重复测试直到失败(重点!)
        • 小栗子
        • 执行命令
        • 执行结果
      • @pytest.mark.repeat(count)
        • 执行命令
        • 执行结果
      • --repeat-scope
        • 案例一:class
        • 执行命令
        • 执行结果
        • 案例二:module
        • 执行命令
        • 执行结果
      • 兼容性问题
    • 配置文件pytest.ini的详细使用
    • 多重校验插件之pytest-assume的详细使用
    • 分布式测试插件之pytest-xdist的详细使用
    • pytest-xdist分布式测试的原理和流程
    • 超美测试报告插件之allure-pytest的基础使用
    • 我们需要掌握的allure特性
    • allure的特性,@allure.step()、allure.attach的详细使用
    • allure的特性,@allure.description()、@allure.title()的详细使用
    • allure的特性,@allure.link()、@allure.issue()、@allure.testcase()的详细使用
    • allure 打标记之 @allure.epic()、@allure.feature()、@allure.story() 的详细使用
    • allure 环境准备
    • allure.severity 标记用例级别
    • 清空 allure 历史报告记录
    • allure 命令行参数
    • 参数化 parametrize + @allure.title() 动态生成标题
    • 详解 allure.dynamic 动态生成功能
    • 使用 pytest-xdist 分布式插件,如何保证 scope=session 的 fixture 在多进程运行情况下仍然能只运行一次
  • 自动化测试
  • Pytest
蟑螂恶霸
2022-07-22
目录

重复执行用例插件之pytest-repeat的详细使用

# 前言

  • 平常在做功能测试的时候,经常会遇到某个模块不稳定,偶然会出现一些bug,对于这种问题我们会针对此用例反复执行多次,最终复现出问题来
  • 自动化运行用例时候,也会出现偶然的bug,可以针对单个用例,或者针对某个模块的用例重复执行多次

# 环境前提

  • Python 2.7、3.4+或PyPy
  • py.test 2.8或更高版本

# 安装插件

pip3 install pytest-repeat -i http://pypi.douban.com/simple/ --trusted-host pypi.douban.com
1

# 快速入门

结合之前讲到的失败重跑、输出html报告插件来敲命令行

两种方式皆可,等号或空格

  • count=2
  • count 2
pytest --html=report.html --self-contained-html  -s --reruns=5 --count=2 10fixture_request.py
1

# 重复测试直到失败(重点!)

  • 如果需要验证偶现问题,可以一次又一次地运行相同的测试直到失败,这个插件将很有用
  • 可以将pytest的 -x 选项与pytest-repeat结合使用,以强制测试运行程序在第一次失败时停止
py.test --count=1000 -x test_file.py
1

# 小栗子

def test_example():
    import random
    flag = random.choice([True, False])
    print(flag)
    assert flag
1
2
3
4
5

# 执行命令

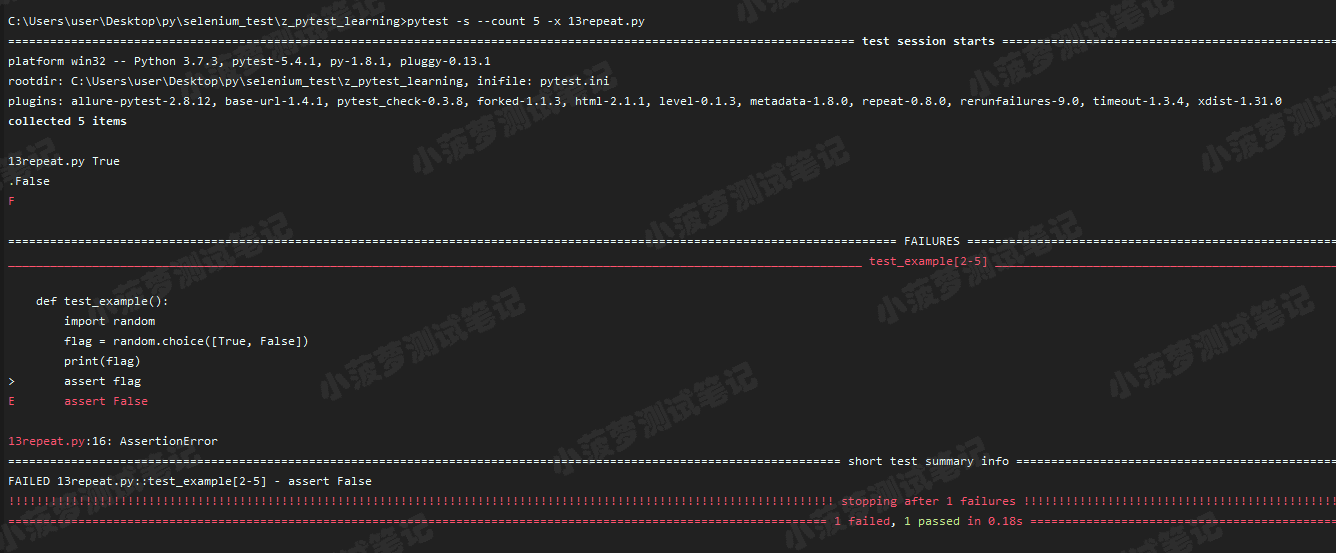
pytest -s --count 5 -x 13repeat.py  
1

# 执行结果

# @pytest.mark.repeat(count)

如果要在代码中将某些测试用例标记为执行重复多次,可以使用 @pytest.mark.repeat(count)

@pytest.mark.repeat(5)
def test_repeat():
    print("测试用例执行")
1
2
3

# 执行命令

pytest -s 13repeat.py
1

# 执行结果

# --repeat-scope

命令行参数

**作用:**可以覆盖默认的测试用例执行顺序,类似fixture的scope参数

  • function:默认,范围针对每个用例重复执行,再执行下一个用例
  • class:以class为用例集合单位,重复执行class里面的用例,再执行下一个
  • module:以模块为单位,重复执行模块里面的用例,再执行下一个
  • session:重复整个测试会话,即所有测试用例的执行一次,然后再执行第二次

# 案例一:class

class Test_repeat:
    def test_repeat3(self):
        print("测试用例执行333")

class Test_repeat2:
    def test_repeat3(self):
        print("测试用例执行444")
1
2
3
4
5
6
7

# 执行命令

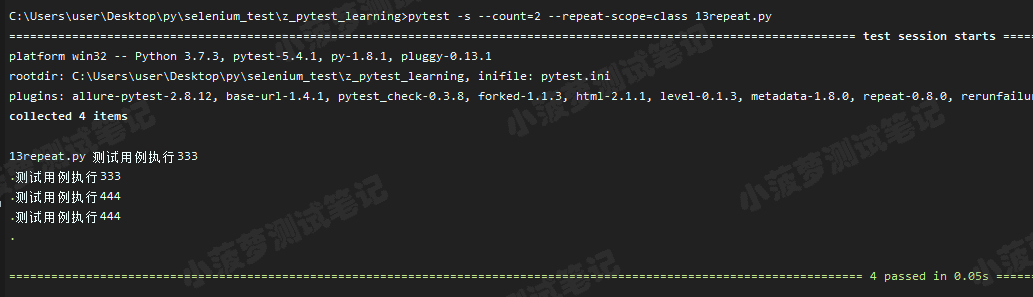
pytest -s --count=2 --repeat-scope=class 13repeat.py
1

# 执行结果

# 案例二:module

def test_repeat1():
    print("测试用例执行111")

def test_repeat2():
    print("测试用例执行222")

class Test_repeat:
    def test_repeat3(self):
        print("测试用例执行333")
1
2
3
4
5
6
7
8
9

# 执行命令

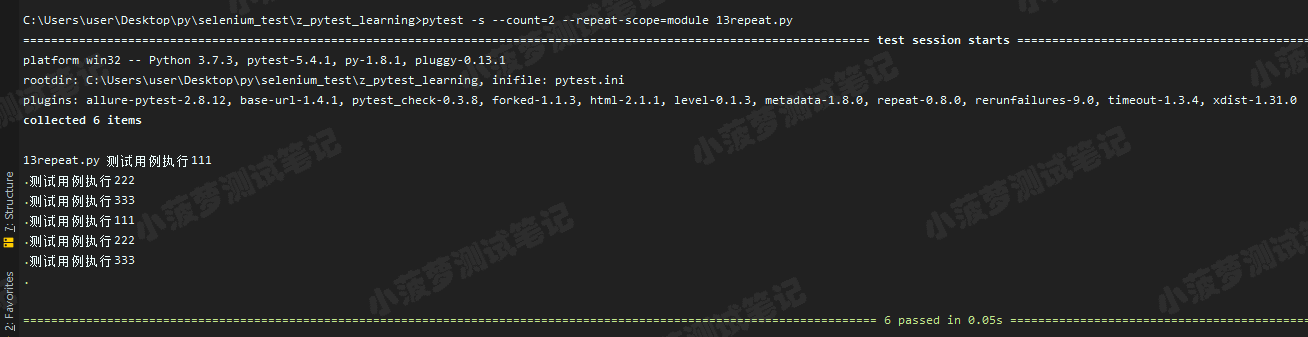
pytest -s --count=2 --repeat-scope=module 13repeat.py
1

# 执行结果

# 兼容性问题

pytest-repeat不能与unittest.TestCase测试类一起使用。无论--count设置多少,这些测试始终仅运行一次,并显示警告

本文转自 https://www.cnblogs.com/poloyy/p/12691240.html (opens new window),如有侵权,请联系删除。

上次更新: 2022/10/15, 15:19:25
测试结果生成HTML报告插件之pytest-html的详细使用
配置文件pytest.ini的详细使用

← 测试结果生成HTML报告插件之pytest-html的详细使用 配置文件pytest.ini的详细使用→

最近更新
01
实现定时任务数据库配置
06-09
02
SQL Server连接
02-22
03
RSA加密工具类
02-22
更多文章>
Theme by Vdoing | Copyright © 2022-2023 蟑螂恶霸 | Blog
  • 跟随系统
  • 浅色模式
  • 深色模式
  • 阅读模式