 使用 pytest-xdist 分布式插件,如何保证 scope=session 的 fixture 在多进程运行情况下仍然能只运行一次
# 背景
- 使用 pytest-xdist 分布式插件可以加快运行,充分利用机器多核 CPU 的优势
- 将常用功能放到 fixture,可以提高复用性和维护性
- 做接口自动化测试的时候,通常我们会将登录接口放到 fixture 里面,并且 scope 会设置为 session,让他全局只运行一次
- 但是当使用 pytest-xdist 的时候,scope=session 的 fixture 无法保证只运行一次,官方也通报了这一问题
# 官方描述
- pytest-xdist 的设计使每个工作进程将执行自己的测试集合并执行所有测试子集,这意味着在不同的测试过程中,要求高级范围的 fixture(如:session)将会被多次执行,这超出了预期,在某些情况下可能是不希望的
- 尽管 pytest-xdist 没有内置支持来确保 scope=session 的fixture 仅执行一次,但是可以通过使用锁定文件进行进程间通信来实现
# 前置知识
pytest-xdist 分布式插件使用详细教程
https://www.cnblogs.com/poloyy/p/12694861.html (opens new window)
pytest-xdist 分布式插件原理
https://www.cnblogs.com/poloyy/p/12703290.html (opens new window)
fixture 的使用详细教程
[https://www.cnblogs.com/poloyy/p/12642602.html
](https://www.cnblogs.com/poloyy/p/12642602.html)
官方文档
https://pypi.org/project/pytest-xdist/ (opens new window)
# 官方解决办法(直接套用就行)
import json

import pytest
from filelock import FileLock


@pytest.fixture(scope="session")
def session_data(tmp_path_factory, worker_id):
    if worker_id == "master":
        # not executing in with multiple workers, just produce the data and let
        # pytest's fixture caching do its job
        return produce_expensive_data()

    # get the temp directory shared by all workers
    root_tmp_dir = tmp_path_factory.getbasetemp().parent

    fn = root_tmp_dir / "data.json"
    with FileLock(str(fn) + ".lock"):
        if fn.is_file():
            data = json.loads(fn.read_text())
        else:
            data = produce_expensive_data()
            fn.write_text(json.dumps(data))
    return data
1
2
3
4
5
6
7
8
9
10
11
12
13
14
15
16
17
18
19
20
21
22
23
24
2
3
4
5
6
7
8
9
10
11
12
13
14
15
16
17
18
19
20
21
22
23
24
- 若某个 scope = session 的 fixture 需要确保只运行一次的话,可以用上面的方法,直接套用,然后改需要改的部分即可(这个后面详细讲解)
- **官方原话:**这项技术可能并非在每种情况下都适用,但对于许多情况下,它应该是一个起点,在这种情况下,对于 scope = session 的fixture 只执行一次很重要
# 后续栗子的代码
# 项目结构
xdist+fixture(文件夹)
│  tmp(存放 allure 数据文件夹)
│  conftest.py
│  test_1.py
│  test_2.py
│  test_3.py
│ __init__.py │
1
2
3
4
5
6
7
2
3
4
5
6
7
# test_1.py 代码
import os

def test_1(test):
    print("os 环境变量",os.environ['token'])
    print("test1 测试用例", test)
1
2
3
4
5
2
3
4
5
# test_2.py 代码
import os

def test_2(test):
    print("os 环境变量",os.environ['token'])
    print("test2 测试用例", test)
1
2
3
4
5
2
3
4
5
# test_3.py 代码
import os

def test_3(test):
    print("os 环境变量",os.environ['token'])
    print("test3 测试用例", test)
1
2
3
4
5
2
3
4
5
# 未解决情况下的栗子
# conftest.py 代码
import os
import pytest
from random import random


@pytest.fixture(scope="session")
def test():
    token = str(random())
    print("fixture:请求登录接口,获取token", token)
    os.environ['token'] = token
    return token
1
2
3
4
5
6
7
8
9
10
11
2
3
4
5
6
7
8
9
10
11
# 运行命令
pytest -n 3 --alluredir=tmp
1
# 运行结果
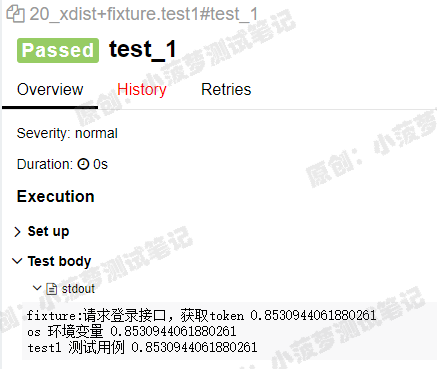
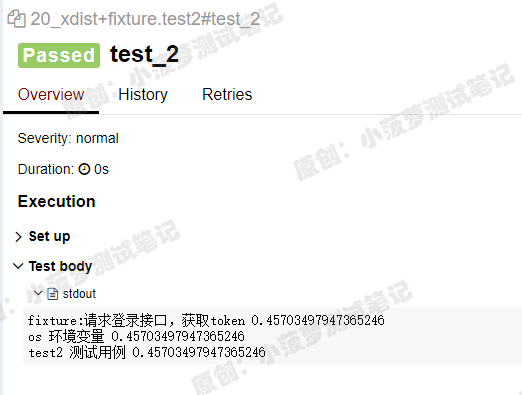
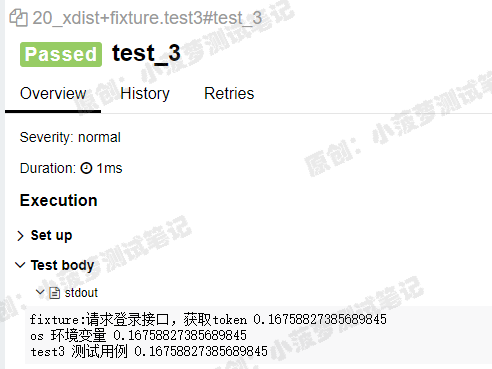
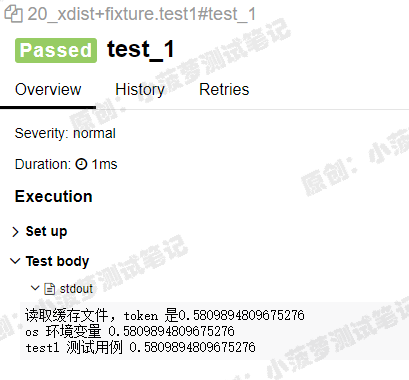
scope=session 的 fixture 很明显执行了三次,三个进程下的三个测试用例得到的数据不一样,明显不会是我们想要的结果
# 使用官方解决方法的栗子
import json
import os
import pytest
from random import random
from filelock import FileLock

@pytest.fixture(scope="session")
def test(tmp_path_factory, worker_id):
    # 如果是单机运行 则运行这里的代码块【不可删除、修改】
    if worker_id == "master":
        """
        【自定义代码块】
        这里就写你要本身应该要做的操作,比如:登录请求、新增数据、清空数据库历史数据等等
        """
        token = str(random())
        print("fixture:请求登录接口,获取token", token)
        os.environ['token'] = token

        # 如果测试用例有需要,可以返回对应的数据,比如 token
        return token

    # 如果是分布式运行
    # 获取所有子节点共享的临时目录,无需修改【不可删除、修改】
    root_tmp_dir = tmp_path_factory.getbasetemp().parent
    # 【不可删除、修改】
    fn = root_tmp_dir / "data.json"
    # 【不可删除、修改】
    with FileLock(str(fn) + ".lock"):
        # 【不可删除、修改】
        if fn.is_file():
            # 缓存文件中读取数据,像登录操作的话就是 token 【不可删除、修改】
            token = json.loads(fn.read_text())
            print(f"读取缓存文件,token 是{token} ")
        else:
            """
            【自定义代码块】
            跟上面 if 的代码块一样就行
            """
            token = str(random())
            print("fixture:请求登录接口,获取token", token)
            # 【不可删除、修改】
            fn.write_text(json.dumps(token))
            print(f"首次执行,token 是{token} ")

        # 最好将后续需要保留的数据存在某个地方,比如这里是 os 的环境变量
        os.environ['token'] = token
    return token
1
2
3
4
5
6
7
8
9
10
11
12
13
14
15
16
17
18
19
20
21
22
23
24
25
26
27
28
29
30
31
32
33
34
35
36
37
38
39
40
41
42
43
44
45
46
47
2
3
4
5
6
7
8
9
10
11
12
13
14
15
16
17
18
19
20
21
22
23
24
25
26
27
28
29
30
31
32
33
34
35
36
37
38
39
40
41
42
43
44
45
46
47
# 运行命令
pytest -n 3 --alluredir=tmp
1
# 运行结果
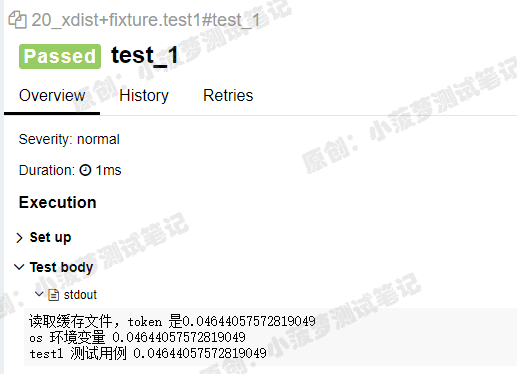
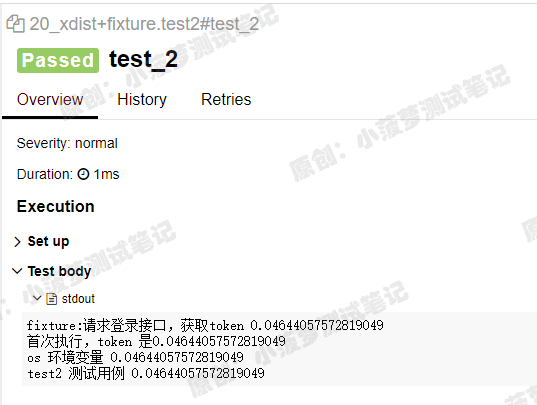
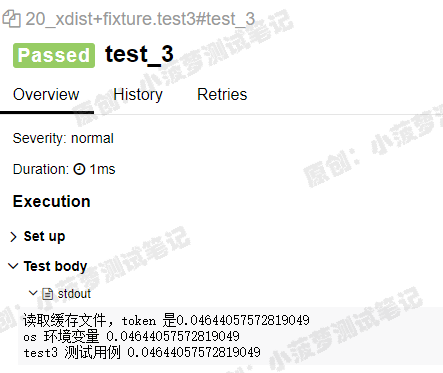
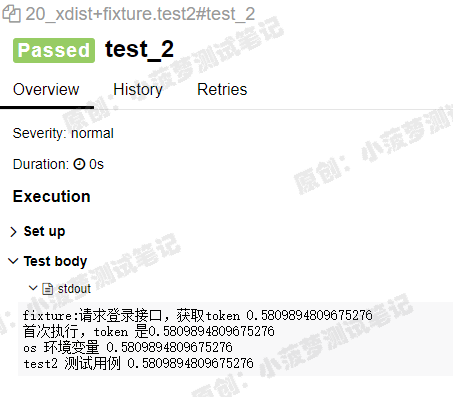
可以看到 fixture 只执行了一次,不同进程下的测试用例共享一个数据 token
# 重点
- 读取缓存文件并不是每个测试用例都会读,它是按照进程来读取的
- 比如 -n 3 指定三个进程运行,那么有一个进程会执行一次 fixture(随机),另外两个进程会各读一次缓存
- 假设每个进程有很多个用例,那也只是读一次缓存文件,而不会读多次缓存文件
- 所以最好要将从缓存文件读出来的数据保存在特定的地方,比如上面代码的 os.environ 可以将数据保存在环境变量中
# 两个进程跑三个测试用例文件
还是上面栗子的代码
# 运行命令
pytest -n 2 --alluredir=tmp
1
# 运行结果
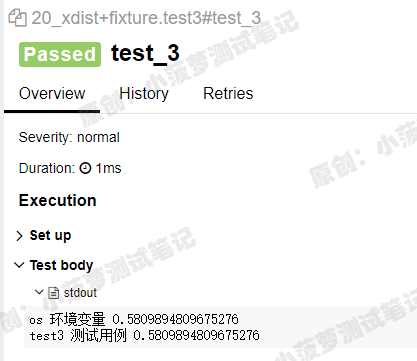
可以看到 test_3 的测试用例就没有读缓存文件了,每个进程只会读一次缓存文件,记住哦!
本文转自 https://www.cnblogs.com/poloyy/p/14708825.html (opens new window),如有侵权,请联系删除。
上次更新: 2022/10/15, 15:19:25